Elementor WooCommerce Cart Widget
Elementor WooCommerce Cart Widget’s new Cart Widget empowers you to completely tweak your truck page, ensuring it matches your image and is set up to streamline deals. Figure out how to add and alter the Cart gadget in this instructional exercise.
Have you at any point wanted that you could make and alter the WooCommerce truck page utilizing Elementor’s visual connection point?
We have incredible news! In the Elementor Pro 3.5 delivery in November 2021, we expanded Elementor WooCommerce Builder with new highlights including devoted gadgets for your store’s shopping basket, checkout, and my record pages.
Though before you expected to depend on your WooCommerce subject to control these key pages, you’ll currently have the option to control the plan, design, and content of these components straightforwardly from Elementor.
In this instructional exercise, we will zero in on the most proficient method to utilize one explicit component — the new Cart gadget. All the more explicitly, you will figure out how to utilize Elementor Pro’s new Cart gadget to control and advance your store’s truck page without leaving Elementor.
To see this instructional exercise in video design, you can watch the video above. In any case, continue to peruse for the full text-based instructional exercise that tracks with the video.
How Does the Elementor Cart Widget Work?
Your store’s shopping basket is a fundamental piece of your online business site’s client experience. Shopping baskets improve on the installment interaction for your clients and make it simple for customers to save the items that they’re keen on.
With Elementor’s new Cart gadget, you can utilize Elementor’s visual plan point of interaction to completely modify your truck page to ensure it matches the remainder of your store’s marking and is set up to advance deals.
Here are a few instances of the kinds of customizations that you’ll have the option to make with the Cart gadget:
- Choose different cart layouts, such as a one-column or two-column layout.
- Customize all of the colors and typography for every single element in your cart.
- Configure the layout and spacing of each element on a granular level, such as adjusting the row gap between certain cart information.
- Edit the labels for key areas of your cart page, along with the text for various buttons.
- Customize your cart’s forms, such as the coupon form and shipping rate calculator.
Likewise, with all of your Elementor plans, you’ll likewise get extraordinary choices to redo how your truck looks on changed gadgets, which allows you to ensure each customer has an incredible encounter, regardless of whether they’re perusing on a work area, tablet, or cell phone.
How To Use the Cart Widget in Elementor
Now, let’s get into the step-by-step guide for how you can start using the Elementor Cart widget on your WooCommerce store.
1. Edit Your Store’s Default Cart Page in Elementor
When you create a WooCommerce store, WooCommerce will automatically create a cart page for your store that uses the WooCommerce cart shortcode.
For this tutorial, you’re going to use this existing page for your design. But rather than just sticking with the default styling from your theme, you’ll edit this page with Elementor to access all of Elementor’s design options.
To begin, go to the Pages list in your dashboard and find the Cart page. It should be marked as “Cart Page”.
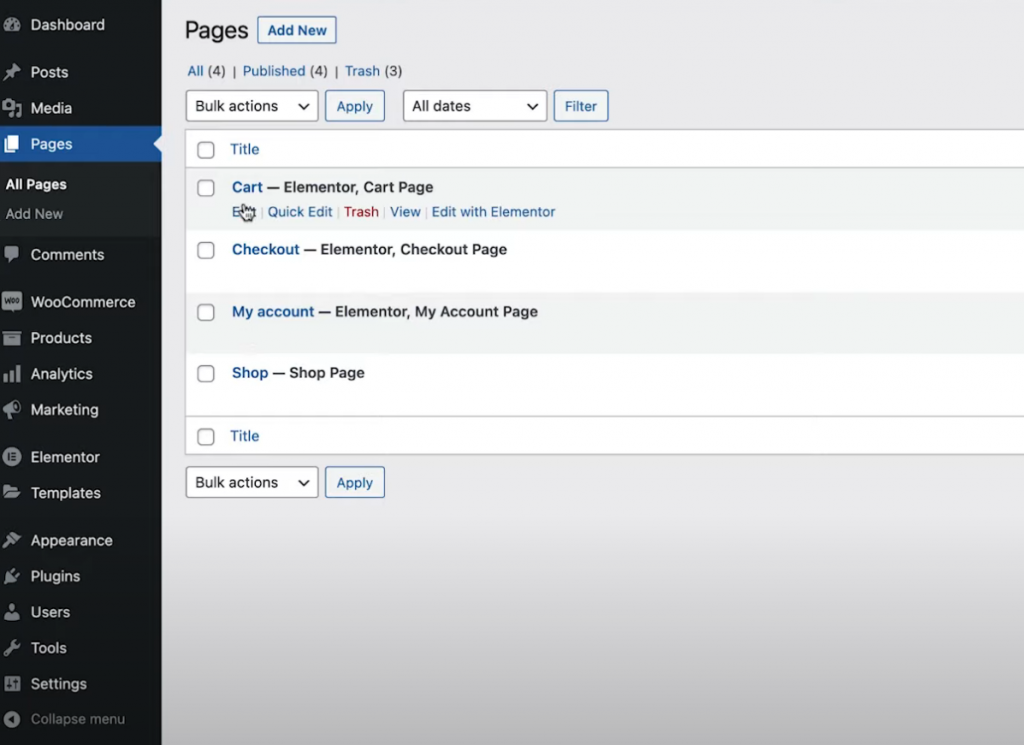
Once you find it, click the Edit button to open the WordPress editor. Then, inside the editor, click the option to Edit With Elementor to launch Elementor’s interface.
2. Replace the WooCommerce Cart Shortcode With the Elementor Cart Widget
When you first open your store’s existing cart page in Elementor, you’ll see the [woocommerce_cart] shortcode in an Elementor Text Editor widget.
To start your design, you’ll want to delete this existing widget/shortcode and replace it with Elementor’s new dedicated Cart widget:
Now, you’re ready to start customizing the design of your cart page.
Note – we recommend adding some items to your shopping cart so that you can see what a “full” cart looks like while you’re working on your design. Otherwise, you’ll see your cart in its empty state when you’re working in Elementor.
You can do this by going to the frontend of your store, adding some items to your cart, and then reloading the Elementor interface. Once you reload Elementor, those items should appear in your cart while you’re working on your design.
If you ever want to go back to previewing how an “empty” cart looks, you can just remove those items from your cart on the frontend of your site and then reload the Elementor interface.
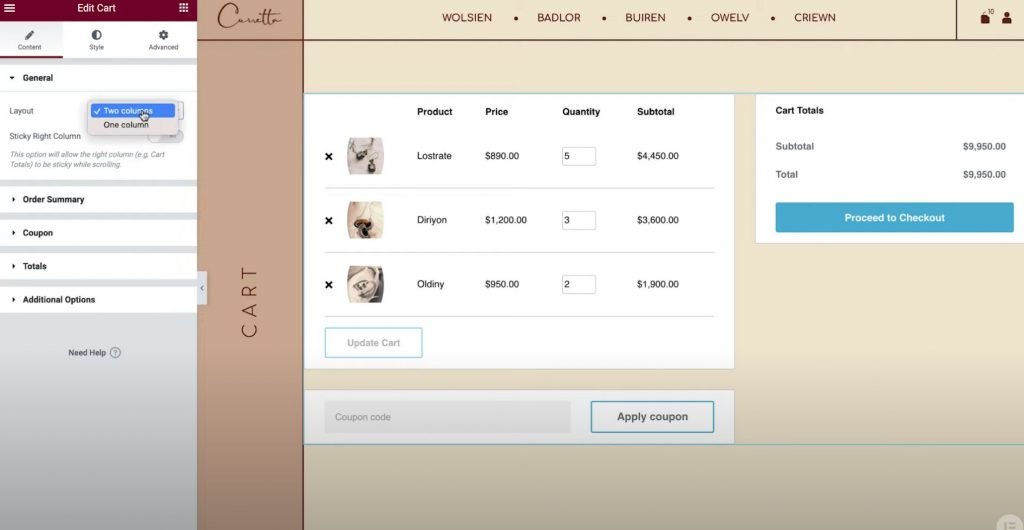
3. Set Up the Layout of Your Cart
To control the layout, design, and other behavior of your cart, you can open its settings in the sidebar just like you would edit any other Elementor widget.
To start, you can choose between using a one-column or two-column layout in the Layout drop-down of the General settings. Using a two-column layout is nice because it brings the cart totals up top, which makes the cart totals more visible when browsing on larger devices.
You can also make the cart totals column sticky on a scroll by enabling the Sticky Right Column toggle. You might want to also add an offset to ensure that this doesn’t overlap with other content.
Next, you can use the Order Summary settings to adjust the “Update Cart” button text if needed.
In the Totals settings, you’ll get similar options to adjust the labels and alignment of various cart elements, such as the “Proceed to Checkout” button text.
If you’ve enabled the WooCommerce shipping calculator feature, you can also configure that in the widget’s settings. You can enable the shipping calculator in WooCommerce’s settings by going to WooCommerce → Settings → Shipping → Shipping options and checking the box to enable the shipping calculator on the cart page.
Finally, the Additional Options settings give you a toggle to enable automatic cart updates. Instead of requiring shoppers to click the Update button to apply their changes; enabling this feature, will update the cart automatically without a page reload.
4. Adjust the Styling of Your Cart
Now, you can configure the style and design of your cart by going to the Style tab in the widget’s settings. Here, you’ll see a number of different settings areas including Sections, Typography, Forms, and more.
Here are the general style options that you’ll find in each area:
- Sections – you can control the overall style of all three cart widget parts. For example, you can apply a background to the entire cart or add a box-shadow.
- Typography – you can control some general typography and colors for key labels such as titles, descriptions, links, and so on.
- Forms – you can control the styling of the coupon field form and the shipping fields form (if you’ve enabled the shipping calculator on the cart page). For example, you can use the Rows Gap setting to create some space between form fields.
- Buttons – you can style the Apply Coupon and Update buttons with all the Elementor button styling options that you’re familiar with.
- Order Summary – you can control the style for the products in cart and order summary.
- Totals – you can control the design of the “Cart Totals” section, which is what lists the total cost of the shopper’s order.
- Checkout Button – you can control the design of the checkout button. You’ll want to make it eye-catching to ensure shoppers don’t miss it as this is the action that you want them to perform.
- Customize – you can get more granular control over the order summary, coupon, and totals. If you add these options, you’ll get additional settings focused on those areas. For example, you could use this to make your “totals” section stand out from the rest of your cart with a separate background color, box-shadow, border, and so on.
5. Customize the Mobile Version of Your Cart
At the point when you utilize the Elementor Cart gadget, your truck will be portable responsive naturally. Nonetheless, as with other Elementor gadgets and plans, you can likewise go in and physically change how your truck should look on changed gadgets to make the most perfect insight for each customer.
To do this, open Elementor’s responsive altering mode, and afterward, you’ll see gadget symbols close to the settings that you’re ready to change for various gadgets.
For instance, you can change the line hole contingent upon whether somebody is utilizing a work area or cell phone or change the text dimension of various components.
6. Adjust WooCommerce Settings in Site Settings If Needed
This last advance is discretionary, yet it merits bringing up that you can likewise control key WooCommerce page tasks from the Elementor Site Settings region.
For instance, assuming that you made another page for your truck with Elementor as opposed to altering the current WooCommerce truck page, you could advise WooCommerce to utilize your new page from the Elementor Site Settings.
You can get to these choices from the WooCommerce tab of the standard Site Settings region. The WooCommerce choice will show up under the Settings heading.
Create and Customize Your Cart Page Without Leaving Elementor
With the new WooCommerce Cart gadget in Elementor Pro, you would now be able to make and redo your truck page without leaving Elementor.
Utilizing Elementor’s settings, you’ll have the option to redo the plan of each component, look over changed designs, change the marks, and that’s just the beginning. Having this additional command over your truck page will enable you to guarantee a durable plan with the remainder of your store and improve your truck page to help deals.
In addition, Elementor Pro likewise has new gadgets for other key spaces of your store, for example, the checkout page and My Account page. These gadgets dispose of the need to utilize WooCommerce shortcodes and give you more command over your store than any other time in recent memory.
These new gadgets expand on the current highlights that you had in WooCommerce Builder, for example, the capacity to tweak the WooCommerce single item page.
Assuming you’re as of now utilizing Elementor Pro and WooCommerce Builder, you can begin with the Cart gadget today by following this instructional exercise. On the off chance that you’re not utilizing Elementor Pro yet, overhaul today to get to the new Cart gadget, WooCommerce Builder, and the wide range of various incredible elements in Elementor Pro.