W3 Total Cache Plugin
Do you want to install and set up W3 Total Cache on your WordPress website? W3 Total Cache is a popular WordPress caching plugin that helps you to improve your website speed and performance.
w3 Techniques guide we’ll show you how to easily install and set up W3 Total Cache on your WordPress website.
What is W3 Total Cache?
W3 Total Cache is one of the best WordPress caching plugins that allows you to easily improve WordPress performance and speed.
By default, WordPress uses PHP to dynamically generate each page on your website when it is requested by a user.
PHP is a server-side programming language. This means each user request increases the load on your server. This affects your website’s performance, user experience, and SEO.
WordPress caching plugins help you reduce this by skipping PHP and serving a cached copy of your webpage. It also allows you to easily connect your website to a CDN (content delivery network) to further improve your website performance.
Install to W3 Total Cache in WordPress
Before you introduce the W3 Total Cache module in WordPress, you’ll have to ensure that you deactivate some other reserving module on your site. This would assist you with saving server assets and forestall any module clashes.
From that point onward, you can feel free to introduce and initiate the W3 Total Cache module. For additional subtleties, see our bit-by-bit guide on the most proficient method to introduce a WordPress module.
Upon enactment, W3 Total Cache will add another menu thing marked ‘Execution’ to your WordPress administrator sidebar. Tapping on it will send off the module’s arrangement wizard.
Simply click on the Next button to continue.
First, you will be asked to turn on Page Cache. Click on the Test Page Cache button to continue.
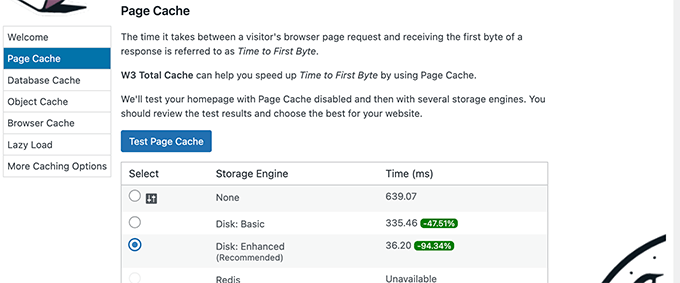
W3 Total Cache will show you different storage engine options. You need to choose one that saves you the most time. Usually, it will be the ‘Disk: Enhanced’ option for most shared hosting platforms.
Click on the Next button to continue.
Now, you will be given the option to Test Database Cache. We recommend choosing None. For most small to medium-sized websites, your MySQL server will be able to fetch data more quickly than the Database cache.
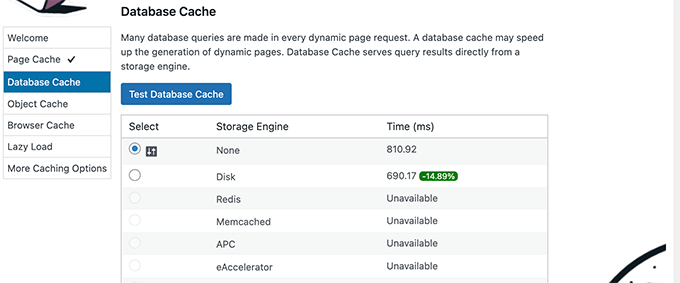
Click on the Next button to move on to the next step.
This will bring you to the Object Cache section. Object Caching allows W3 Total Cache to store database queries for dynamic pages and reuse them to improve performance.
If the test result shows barely a few milliseconds difference then you can choose None.
Click on the next button to continue.
After that, click on the Test Browser Cache button and then select the ‘Enabled’ option under the test results.
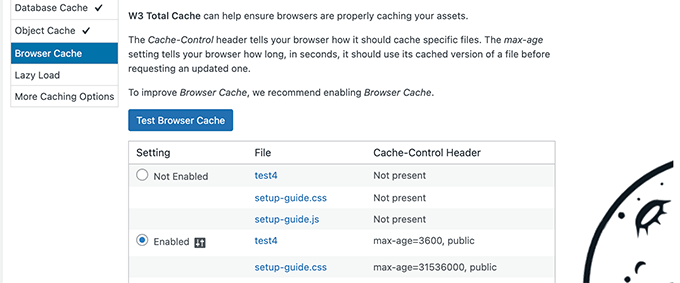
This option requests users’ browsers to store a copy of the web page for a limited time. Loading a page from a browser cache is much faster than loading it from your web server’s cache.
Click on the next button to move on to the next step.
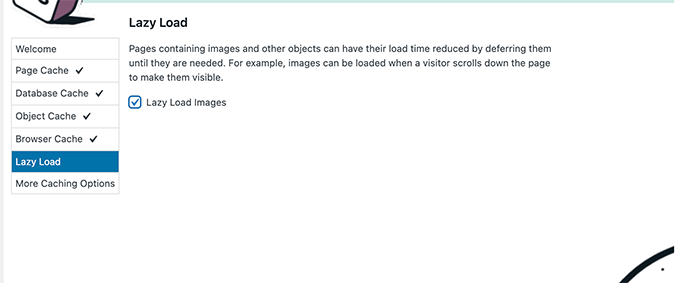
Lastly, the setup wizard will ask you to enable lazy loading for images.
Now, WordPress comes with built-in lazy loading for images. However, some older browsers may not have support for that feature.
W3 Total Cache uses JavaScript to add lazy loading for images, which can be even faster and more efficient.
After that, click on the Next button to finish the setup wizard and view W3 Total Cache dashboard.
Advanced Caching Options in W3 Total Cache
The basic settings would work for most websites. However, there are many advanced options that you can configure to further improve performance.
Let’s take a look at the most important ones.
Minifying JavaScript and CSS in W3 Total Cache
The term ‘minify’ is utilized to portray a strategy that makes your site record sizes more modest. It does this by eliminating void areas, lines, and pointless characters from the source code.
Note: Minifying JS and CSS documents might possibly break your site. In the event that you turn it on and your site doesn’t look right, then basically impair these choices.
W3 Total Cache permits you to effortlessly minify JavaScript, CSS, and HTML source code also. Be that as it may, we suggest just minifying JavaScript and CSS documents.
Simply head over to the Performance » Minify page and scroll down to the JS section.

Then Check the box next to ‘JS minify settings’ to enable it.
Now, scroll down to the CSS section and enable CSS minify settings the same way.
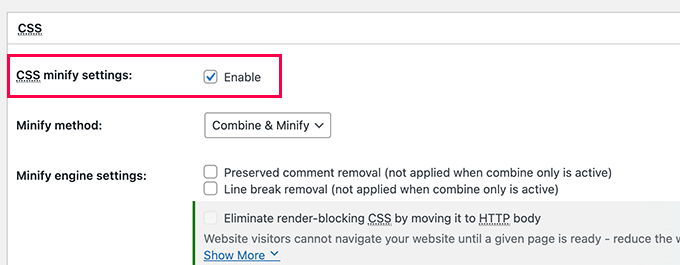
Don’t forget to click on the Save All Settings button to store your settings.
Enable CDN Support in W3 Total Cache
CDNs or content delivery networks help you further improve your website performance by serving static files like images, CSS, JavaScript from a global network of servers.
This reduces the load on your WordPress hosting server and improves page load speed.
W3 Total Cache comes with built-in support for various CDN platforms.
We recommend using Bunny.net which is the best CDN solution on the market. This is what we use for our OptinMonster website.
First, you need to signup for a Bunny.net account. After signup, you need to create a Pull Zone for your website.
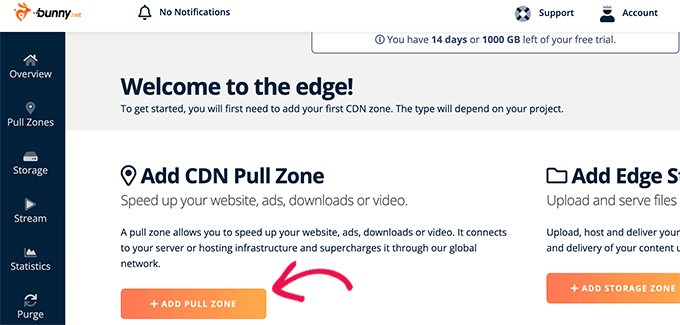
A pull zone adds a hostname to Bunny.net CDN. This hostname is then used to serve static files for your website.
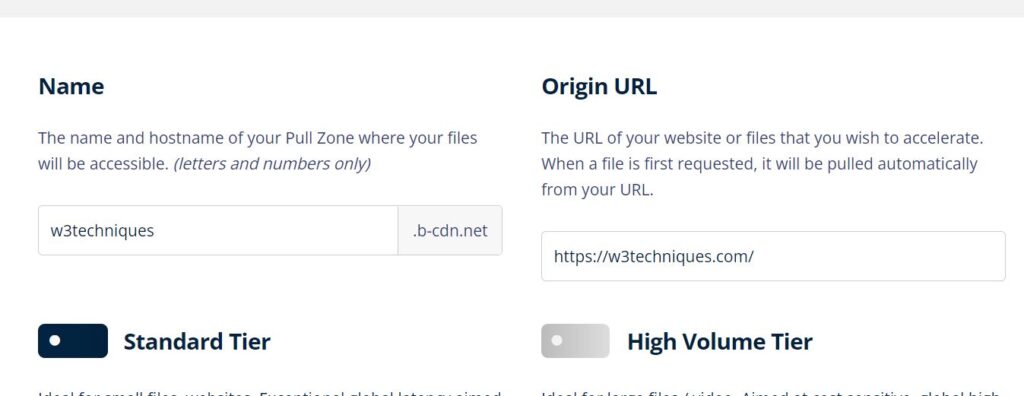
Add a name for your pull zone and then provide your website’s domain name.
After adding the pullzone, you need to visit the Performance » General Settings page and scroll down to the CDN section.
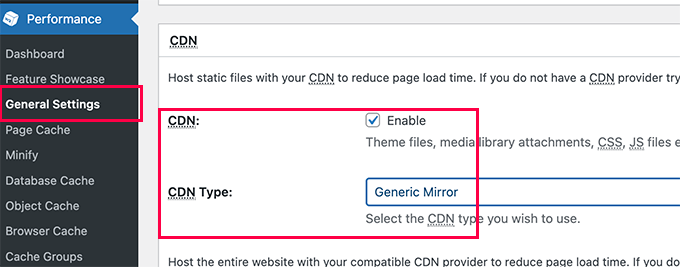
Check the Enable box next to the CDN option and choose Generic Mirror next to the CDN Type option.
Don’t forget to click on the Save All Changes button to store your settings.
Next, you need to visit the Performance » CDN page and scroll down to the Configuration: Objects section.
From here, you need to add the hostname you created earlier for your pull zone and click on the test mirror button.
W3 Total Cache will check the availability of your hostname and will show the Test Passed message when it’s successful.
You can now click on the Save All Changes button to store your settings.
W3 Total Cache will now start serving your static resources from the CDN server.
W3 Total Cache also works well with Cloudflare free CDN. Alternately, you can also use it with Sucuri which is the best website firewall service with built-in CDN service.
Troubleshooting W3 Total Cache Issues
Once you have configured the W3 Total Cache properly, it should work seamlessly in the background to improve WordPress speed and boost performance.
Occasionally, you may come across issues where you don’t see changes you made to your website right away, or a plugin may not be working properly.
The most common reason for those issues is that you are probably seeing an old cached version of your website.
This can be easily fixed by clearing the cache in WordPress.
Simply click on the Performance menu at the top and then select the Purge All Caches option. W3 Total Cache will clear all cached content on your website.

On the off chance that you are as yet seeing the old rendition of your site, have a go at clearing your program store as well.
We trust this article assisted you with introducing and arranging W3 Total Cache in WordPress. You may likewise need to see our total WordPress security guide for amateurs to fortify your site security or look at our correlation of the best GoDaddy choices that are less expensive and more solid.
binance us register
January 31, 2026Thank you for your sharing. I am worried that I lack creative ideas. It is your article that makes me full of hope. Thank you. But, I have a question, can you help me?
88clb8gq
February 5, 202688clb8gq on Blackjack88clb… Sounds interesting will delve more into it. 88clb8gq.
jlbossvipcasino
February 5, 2026JLBossVIPCasino… sounds fancy! VIP treatment, you say? Time to roll like a boss! Let’s get it: jlbossvipcasino
kkkjilislotgame
February 5, 2026Alright, KKKJiliSlotGame… weird name, hope the slots are good! Let’s see if this is the one: kkkjilislotgame
skapa binance-konto
April 18, 2026Can you be more specific about the content of your article? After reading it, I still have some doubts. Hope you can help me. https://www.binance.com/register?ref=QCGZMHR6
Binance
April 26, 2026Your article helped me a lot, is there any more related content? Thanks! https://www.binance.com/register?ref=IHJUI7TF
Binance推荐代码
May 3, 2026I don’t think the title of your article matches the content lol. Just kidding, mainly because I had some doubts after reading the article.